We start the new year off by revisiting an important skill for developing software: version control.
You can also download the original slides.
What you’ll need
- git: https://chryswoods.com/introducing_git/installing.html
- A terminal
- Windows: “Git Bash”
- A text editor like Notepad, nano, gedit
- Four other commands:
mkdir: “Make directory” for making new directoriescd: “Change directory” to change into a directoryls: “List” to list the contents of a directoryrm: “Remove” to remove (delete) a file
What is version control?
What is version control?
- Version control systems record changes to a file/set of files over
time
- Not just software! This talk is under version control
- Allows you revert files back to a previous state, compare changes over time, see who last modified something, etc.
- Instead of keeping multiple copies of the same file, normally just store the differences (“diffs”) between versions of the files
Why is version control important?
- Tracking versions
- Know instantly which is the latest version
- Roll back to previous versions
- See history of project/file/line
- Find out when bugs were introduced
- Maintain/compare different versions
- Coordination between developers
- Easier to keep track of when changes are made
- Easier to work on separate features
- Easier to merge distinct changes from separate developers
- Easier to resolve conflicts on same features
- Tracking who made what changes
If it’s not under version control, it doesn’t exist!
The gist of git
The building blocks: diffs
file_old.md
1 This line has been deleted
2
3 This one has remained the same
4
5 This line has something different
6
file_new.md
1
2 This one has remained the same
3
4 This line has changed
5
6 And this one has been added
diff file_old.md file_new.md
--- file_old.md
+++ file_new.md
@@ -1,6 +1,6 @@
-This line has been deleted

 This one has remained the same

-This line has something different
+This line has changed

+And this one has been added
- Shows differences between individual lines
- Lines beginning with “
-” have been removed - Lines beginning with “
+” have been added - Changed lines are shown as removal plus addition
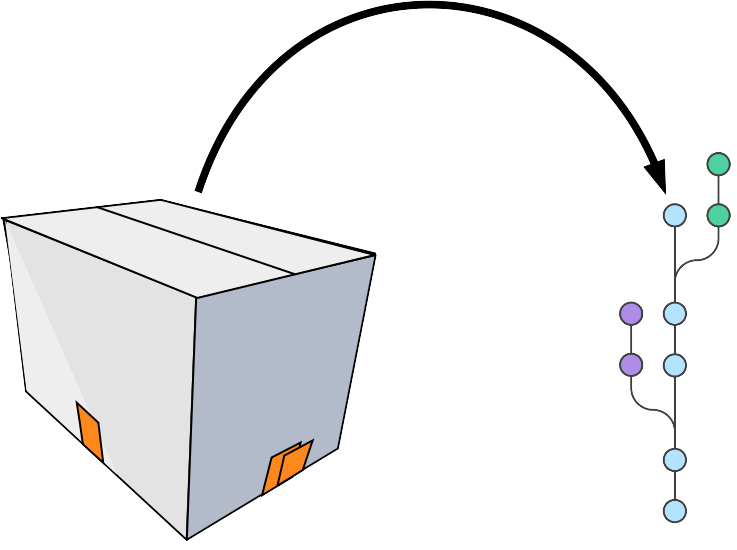
Add diffs to a staging area

Commit the staging area to the repository
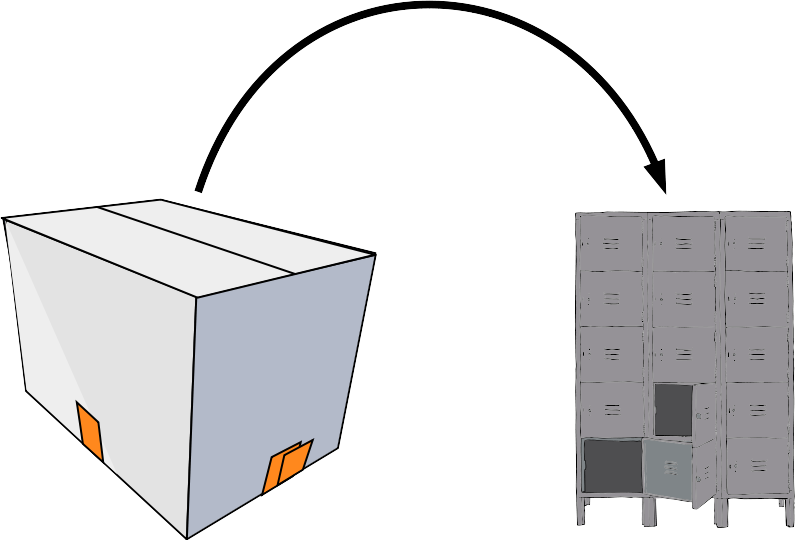
Commit the staging area to the repository
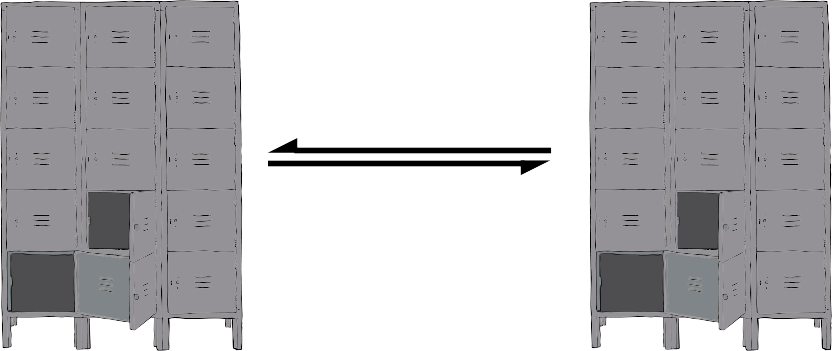
Sync with other people’s repositories
The Three Stages
- Important to understand correctly
- Three main states that files can be in:
- Committed: data stored in repo
- Modified: file is changed but not committed
- Staged: modified file marked to go into next commit
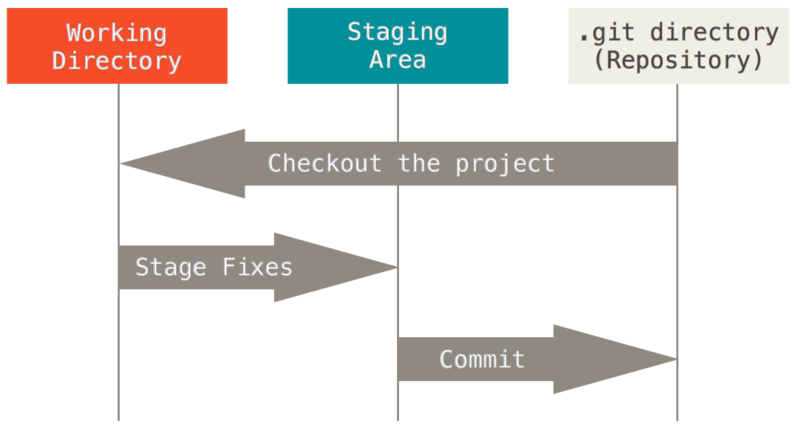 {width=90%}
Using git
Graphical interfaces
For Mac and Windows:
- Github Desktop: https://desktop.github.com/
For Linux:
- git-cola: http://git-cola.github.io/
For Emacs:
- magit: https://magit.vc/
Zeroth step
Very first time using git on a system
- Need to tell git who you are:
  $ git config --global user.email "you@example.com"
  $ git config --global user.name "Your Name"
- Might also need to set text editor:
  $ EDITOR=nano     # terminal-based
  $ EDITOR=gedit    # GUI, Ubuntu only
  $ EDITOR=notepad  # GUI, Windows only
First steps
Making a repository
- Create a new empty directory and change into it
-
Initialise a new git repo
$ mkdir learning_git $ cd learning_git $ git init - Let’s see what it looks like
-
What do you see after typing each of the following commands?
$ ls
$ ls -A
$ git status
Getting help
$ git <command> --help
git status
git status: Show the working tree status- Glossary “Working tree”: what the repository directory looks like, including any changes
- Going to be our most used command today!
- Use it whenever you’re not sure what’s going on
Initial commit
- Create a new file called “README.md”
- Add some text to the file
- What does
git statusshow now? - Follow the instructions to add your new file to the staging area
-
Check
git statusagain$ git status $ git add README.md $ git status
$ nano README.md
# Hello World

Today we're learning about git.

We will use git to track changes
to this file over time.

This is a deliberate tpyo that
we'll fix later.
Initial commit
-
Now we need to actually commit our commit
$ git commit - This will pop up your
EDITOR - The traditional first commit message is “Initial commit”
- Now check
git statusagain
ASIDE: vim
- With plain
git commit, your default editor should pop up- If you hate it, change your
EDITORvariable
- If you hate it, change your
- If you haven’t changed it, it’s probably
vim - Two modes: “insert” and “command”
ito be able to type textESCto enter commandsESC :qto quitESC :wqto write and quit
Previously…
  $ git add README.md
  $ git commit
git add
git add <file>: Add file to the index- Glossary “Index”: the stored form of the working tree, i.e. the staging area, our “box”
git commit
git commit: Record changes to the repository- Until you run
git commit, the changes made to the staging area (index) remain separate from the working tree and repository
Writing commit messages
- Writing good commit messages is a skill!
- Commit messages serve as documentation for your project
- Finish the sentence: “This commit will…”
Good
- Fix bug in boundary conditions
- Add new routine for calculating potential
Bad
- update code
- I fixed some stuff
First steps
Making our first change
- Fix the typo in
README.md - Time for
git status -
Ok, but how to actually see the changes?
$ git diff # All files $ git diff <file>... # Just certain files - Press
qto quit the “pager”
Commit the change
-
It’s a two-step step:
addthencommit$ git add <file> $ git commit -m "Fix typo in README"
git diff
git diff: Show changes between commits, commit and working tree, etc- Without arguments, or with just files, shows differences between the working tree and the staging area
- Use
git diff --stagedto see the difference between staging area and latest commit (i.e. what’s going into the next commit)
Updating the staging area
- Make a change and
git addit - Now make another change to the same bit of that file
- Check
git status, what do you see? - Try
git diff, thengit diff --staged, what’s the difference? git addyour second change, and try the twodiffcommands again
Updating the staging area
# Edit file
$ git add <file>
# Edit file again
$ git status
$ git diff
$ git diff --staged
$ git add <file>
$ git status
$ git diff
$ git diff --staged
Looking back
- Make some more changes and make two or three more commits
-
View the history so far:
$ git log -
View a particular commit in more detail:
$ git show <hash> - Glossary “commit hash”: a 40-digit hexadecimal “hash” that uniquely identifies a commit. Generally only ~7 digits are needed. The largest projects need upto 12
git log
git log: Show commit logs- There are lots of options here!
- Lots of ways to format the log, or search for particular commits
- Some useful ones:
--oneline: One line per commit--all: Show all branches--graph: Show a graph of branches
git show
git show: Show various types of objects- Also lots of options for formatting the output, etc.
Undoing unwanted changes
- Delete your file!
rm README.md
- Check
git status– can you see how to get it back (i.e. discard the change)?
Undoing changes to the index
- Make a change to a file and now add but don’t commit
- The usual –
git status– how do you remove something from the staging area?
Undoing things
# Make a change to a file
$ git restore <file>
# Or on older versions of git:
$ git checkout -- <file>
# Make another change
$ git add <file>
$ git restore --staged <file>
# Or on older versions of git:
$ git reset HEAD <file>
git restore
git restore <file>: Restore a file, discarding local changesgit restore --staged <file>: Remove a file from the staging area (index)- This command was added in January 2020, so your OS might only have an older version!
git checkout
git checkout [options]: Switch branches or restore working tree files- Glossary “checkout”: modify the working tree en masse
-
Remove unwanted changes to a file:
$ git checkout -- <file> - Note: one of the few things in git that can’t be undone!
git reset
git reset: Reset current HEAD to the specified state- Glossary “HEAD”: the current commit that the working tree is based on
resetcan change the working tree and/or staging area, but doesn’t change HEAD, i.e. what commit you’re working from-
Remove a file from the staging area (but leave the changes in the working tree):
$ git reset HEAD <file>
Beyond the basics: branches
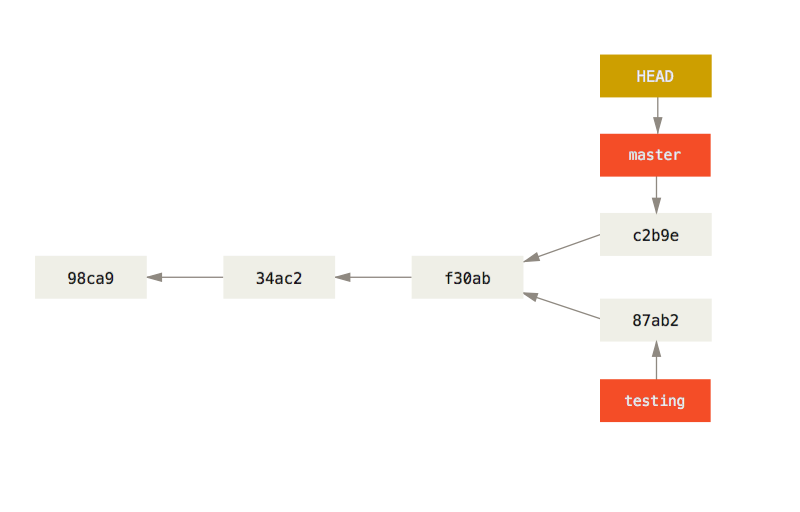
What is a branch?
- A git repo is like a tree (technically a directed acyclic graph), and like trees has branches
- More practically, a branch is just a label for a particular commit
- Can have lots of different labels on a given commit, i.e. lots of branches all the same
- Default first branch is called “master”
- You’re not forced to share your local branches with others
- Can experiment and explore, then chuck away branches that didn’t work out
- Making a new branch is always safe!
Making a new branch
git branchcommand is normally not what we want- Make a new branch and check the
statusandlog:$ git switch --create new_branch # Or on older versions of git: $ git checkout -b new_branch $ git status $ git log
Switching branches
-
Switch back to master, check
statusandlog:$ git switch master # Or older versions: $ git checkout master $ git status $ git log
git switch
git switch <branch>: Switch to<branch>git switch --create <branch>: Create new branch<branch>and switch to it- This command was added in January 2020, so your OS might only have an older version!
Making changes on a branch
- Switch back to your new branch
- Create a new file, add some text and save it in your repo
- Add and commit this new file
- Let’s look at a summary of all our branches:
$ git log --oneline --all --graph - Can you see where
master,HEADand your new branch are? - Switch back to
master– what’s happened to your new file?
Making changes on a branch
$ git switch <your branch>
# Add a new file
$ git add <new file>
$ git commit -m "Change text on a branch"
$ git log --oneline --all --graph
$ git switch master
$ ls
Moving forward: Merging
Merging
- Branches are only really useful if we can get those changes back into our main branch
- Merges are probably the biggest cause of problems, as it can be a tricky problem!
- Remember: it’s always safe to make a new branch and try something out there!
- Several different ways to do a merge, with differing results
Fast-forwarding
- This works when the branch being merged from was forked from the tip of the branch being merged into
- Often the nicest way to merge if it’s possible
 ^        C <-- branch2
 |        |
 |        B
 |       /
time    A   <-- branch1
Fast-forwarding
- This works when the branch being merged from was forked from the tip of the branch being merged into
- Often the nicest way to merge if it’s possible
 ^        C <-- branch2  >   C <-- branch1, branch2
 |        |              >   |
 |        B              >   B
 |       /               >   |
time    A   <-- branch1  >   A
A simple case
- You should have two branches:
masterand<your branch> - Only difference should be
<your branch>has an extra file in it - Very simple to merge this case!
- Checkout master and
mergeyour branch -
What does the full log look like now?
$ git switch master
$ git merge <your branch>
$ git log --oneline --all --graph
git merge
git merge: Join two or more development histories together-
From the branch you want to merge something into, run
$ git merge <other branch> -
If you run into trouble, abort the merge, create a new branch from your “main” branch and try things out in there
$ git merge --abort
$ git switch --create test-merge-branch
Non fast-forwarding
- If there are any “conflicts” between the two branches, it’s a little trickier
- You’ll need to resolve the conflicts, and a special “merge commit”
will be created
- This is special as it has two parents
-
Some people/projects prefer to always have a merge commit as this may be easier to remove a feature if it has multiple commits
 ^      C    <- branch1
 |      | B  <- branch2
 |      |/
time    A
Non fast-forwarding
- If there are any “conflicts” between the two branches, it’s a little trickier
- You’ll need to resolve the conflicts, and a special “merge commit”
will be created
- This is special as it has two parents
-
Some people/projects prefer to always have a merge commit as this may be easier to remove a feature if it has multiple commits
             >  D   <- branch1 (merge commit)
             >  |\
 ^      C    >  C |
 |      | B  >  | B <- branch2
 |      |/   >  |/
time    A    >  A
Fixing conflicts
- Conflicts happen when both branches touch the same line(s) in a file
- Conflicts are marked with a diff-like syntax
- To resolve the conflict, just go to the conflicting files and edit them appropriately
-
There are lots of tools that can help you with this, e.g. ediff, meld, diff3
<<<<<<< HEAD line changed in branch1 ======= line changed in branch2 >>>>>>> merging branch - Just delete all the special markers and the lines(s) you don’t want to keep
- Sometimes you want some combination of both regions – just edit the lines to keep what you want
- You can bail out of a merge with
git merge --abort
Creating conflicts
- Make a new file call
conflicts.txtwith the contents “some words” - Commit this file to
master - Now create and checkout a new branch called
conflict-branch - Change
conflicts.txtto read “some more words” - Commit this file on
conflict-branch - Checkout
masteragain and changeconflicts.txtto read “some other words” - Commit this file on
master - Now try to merge
conflict-branchintomaster - Fix the conflict, save the file
$ # Add "some words" to conflicts.txt
$ git add conflicts.txt; git commit
$ git checkout -b conflict-branch
$ # Change conflicts.txt to "some more words"
$ git add conflicts.txt; git commit
$ git checkout master
$ git log --all --oneline --graph
$ # Change conflicts.txt to "some other words"
$ git add conflicts.txt; git commit
$ git merge conflict-branch
# Remove conflict markers from conflicts.txt
$ git add conflicts.txt; git commit
$ git log --all --oneline --graph
Rebasing
- DANGER! This rewrites history!
- This has the biggest potential to cause headaches
- Rebasing a branch onto another one means to change the first branch’s “base” to the new branch
- It works by “replaying” the commits on top of the second branch
^ C <- branch1 | | B <- branch2 | |/ time A - DANGER! This rewrites history!
- This has the biggest potential to cause headaches
- Rebasing a branch onto another one means to change the first branch’s “base” to the new branch
- It works by “replaying” the commits on top of the second branch
> B' <- branch2 ^ C > | | | B > C <- branch1 | |/ > | time A > A B'contains (roughly) the same diffs asB
Stashes
- Very often the case that you want to switch branches, but you have made changes that either clash with the other branch, or you just don’t want to carry over
- Stashes are like commits on “anonymous” branches
- They save both your staged and unstaged changes, then discard them from your working tree
- Change your file, then
stashit - View the stashes with
stash list, and re-apply the latest stash withstash apply
$ git stash
$ git stash list
$ git stash apply
What next?
Applying this to your projects
- Make any existing project into a git repo:
$ git init
$ git add *
$ git commit -m "Initial commit"
- Come along to our drop-in Code Clinic in two weeks to get help!
Working with others
- git does not enforce a particular way of working with other people
- Easiest method is “feature branches”
- Everybody works in branches off the main “master” branch
- When it’s ready to share with others, make a “pull request”
- Other people can check your work
- Easy to resolve conflicts
Further reading
- Chris Wood’s tutorial: https://chryswoods.com/introducing_git/
- Git book: https://git-scm.com/book
- Atlassian tutorial: https://www.atlassian.com/git/tutorials
- Codecademy: https://www.codecademy.com/learn/learn-git
- Software Carpentry https://swcarpentry.github.io/git-novice/