All in One View
Content from Introduction
Last updated on 2026-07-21 | Edit this page
Overview
Questions
- What are the goals of this course?
Objectives
- To understand the learning outcomees of this course
- To understand the structure of the practicals
Welcome to Testing and Continuous Integration with Python
This course aims to equip researchers with the skills to write effective tests and ensure the quality and reliability of their research software. No prior testing experience is required! We’ll guide you through the fundamentals of software testing using Python’s Pytest framework, a powerful and beginner-friendly tool. You’ll also learn how to integrate automated testing into your development workflow using continuous integration (CI). CI streamlines your process by automatically running tests with every code change, catching bugs early and saving you time. By the end of the course, you’ll be able to write clear tests, leverage CI for efficient development, and ultimately strengthen the foundation of your scientific findings.
This course has a single continuous project that you will work on
throughout the lessons and each lesson builds on the last through
practicals that will help you apply the concepts you learn. However if
you get stuck or fall behind during the course, don’t worry! All the
stages of the project for each lesson are available in the
learners/files directory in this course’s
materials that you can copy across if needed. For example if you are
on lesson 3 and haven’t completed the practicals for lesson 2, you can
copy the corresponding folder from the learners/files
directory.
By the end of this course, you should:
- Understand how testing can be used to improve code & research reliability
- Be comfortable with writing basic tests & running them
- Be able to construct a simple Python project that incorporates tests
- Be familiar with testing best practices such as unit testing & the AAA pattern
- Be aware of more advanced testing features such as fixtures & parametrization
- Understand what Continuous Integration is and why it is useful
- Be able to add testing to a GitHub repository with simple Continuous Integration
Code of Conduct
This course is covered by the Carpentries Code of Conduct.
As mentioned in the Carpentries Code of Conduct, we encourage you to:
- Use welcoming and inclusive language
- Be respectful of different viewpoints and experiences
- Gracefully accept constructive criticism
- Focus on what is best for the community
- Show courtesy and respect towards other community members
Instances of abusive, harassing, or otherwise unacceptable behavior may be reported by following our reporting guidelines.
Challenges
This course uses blocks like the one below to indicate an exercise for you to attempt. The solution is hidden by default and can be clicked on to reveal it.
Challenge 1: Talk to your neighbour
- Introduce yourself to your neighbour
- Have either of you experienced a time when testing would have been useful?
- Have either of you written scripts to check that your code is working as expected?
- Perhaps during a project your code kept breaking and taking up a lot of your time?
- Perhaps you have written a script to check that your data is being processed correctly?
- This course will teach you how to write effective tests and ensure the quality and reliability of your research software.
- No prior testing experience is required.
- You can catch up on practicals by copying the corresponding folder
from the
learners/filesdirectory of this course’s materials.
Content from Why Test My Code?
Last updated on 2026-07-21 | Edit this page
Overview
Questions
- Why should I test my code?
Objectives
- Understand how testing can help to ensure that code is working as expected
What is software testing?
Software testing is the process of checking that code is working as expected. You may have data processing functions or automations that you use in your work. How do you know that they are doing what you expect them to do?
Software testing is most commonly done by writing test code that check that your code works as expected.
This might seem like a lot of effort, so let’s go over some of the reasons you might want to add tests to your project.
Catching bugs
Whether you are writing the occasional script or developing a large software, mistakes are inevitable. Sometimes you don’t even know when a mistake creeps into the code, and it gets published.
Consider the following function:
When writing this function, I made a mistake. I accidentally wrote
a - b instead of a + b. This is a simple
mistake, but it could have serious consequences in a project.
When writing the code, I could have tested this function by manually trying it with different inputs and checking the output, but:
- This takes time.
- I might forget to test it again when we make changes to the code later on.
- Nobody else in my team knows if I tested it, or how I tested it, and therefore whether they can trust it.
This is where automated testing comes in.
Automated testing
Automated testing is where we write code that checks that our code works as expected. Every time we make a change, we can run our tests to automatically make sure that our code still works as expected.
If we were writing a test from scratch for the add
function, think for a moment on how we would do it.
We would need to write a function that runs the add
function on a set of inputs, checking each case to ensure it does what
we expect. Let’s write a test for the add function and call
it test_add:
PYTHON
def test_add():
    # Check that it adds two positive integers
    if add(1, 2) != 3:
        print("Test failed!")
    # Check that it adds zero
    if add(5, 0) != 5:
        print("Test failed!")
    # Check that it adds two negative integers
    if add(-1, -2) != -3:
        print("Test failed!")
Here we check that the function works for a set of test cases. We ensure that it works for positive numbers, negative numbers, and zero.
What could go wrong?
The first function will incorrectly greet the user, as it is missing
a space after “Hello”. It would print HelloAlice! instead
of Hello Alice!.
If we wrote a test for this function, we would have noticed that it was not working as expected:
The second function will crash if x2 - x1 is zero.
If we wrote a test for this function, it may have helped us to catch this unexpected behaviour:
PYTHON
def test_gradient():
    if gradient(1, 1, 2, 2) != 1:
        print("Test failed!")
    if gradient(1, 1, 2, 3) != 2:
        print("Test failed!")
    if gradient(1, 1, 1, 2) != "Undefined":
        print("Test failed!")
And we could have amended the function:
Finding the root cause of a bug
When a test fails, it can help us to find the root cause of a bug. For example, consider the following function:
PYTHON
def multiply(a, b):
    return a * a

def divide(a, b):
    return a / b

def triangle_area(base, height):
    return divide(multiply(base, height), 2)
There is a bug in this code too, but since we have several functions
calling each other, it is not immediately obvious where the bug is.
Also, the bug is not likely to cause a crash, so we won’t get a helpful
error message telling us what went wrong. If a user happened to notice
that there was an error, then we would have to check
triangle_area to see if the formula we used is right, then
multiply, and divide to see if they were
working as expected too!
However, if we had written tests for these functions, then we would
have seen that both the triangle_area and
multiply functions were not working as expected, allowing
us to quickly see that the bug was in the multiply function
without having to check the other functions.
Increased confidence in code
When you have tests for your code, you can be more confident that it works as expected. This is especially important when you are working in a team or producing software for users, as it allows everyone to trust the code. If you have a test that checks that a function works as expected, then you can be confident that the function will work as expected, even if you didn’t write it yourself.
Forcing a more structured approach to coding
When you write tests for your code, you are forced to think more carefully about how your code behaves and how you will verify that it works as expected. This can help you to write more structured code, as you will need to think about how to test it as well as how it could fail.
- We might want to check that the speed is within a safe range.
- We might want to check that the direction is a valid direction. ie not towards a tree, and if so, the car should be applying the brakes.
- Automated testing helps to catch hard to spot errors in code & find the root cause of complex issues.
- Tests reduce the time spent manually verifying (and re-verifying!) that code works.
- Tests help to ensure that code works as expected when changes are made.
- Tests are especially useful when working in a team, as they help to ensure that everyone can trust the code.
Content from Simple Tests
Last updated on 2026-07-21 | Edit this page
Overview
Questions
- How to write a simple test?
- How to run the test?
Objectives
- Write a basic test.
- Run the test.
- Understand its output in the terminal.
Your first test
The most basic thing you will want to do in a test is check that an output for a function is correct by checking that it is equal to a certain value.
Let’s take the add function example from the previous
chapter and the test we conceptualised for it and write it in code.
We’ll aim to write the test in such a way that it can be run using
Pytest, the most commonly used testing framework in Python.
- Make a folder called
my_project(or whatever you want to call it for these lessons) and inside it, create a file called ‘calculator.py’, and another file called ‘test_calculator.py’.
Your directory structure should look like this:
calculator.py will contain our Python functions that we
want to test, and test_calculator.py will contain our tests
for those functions.
- In
calculator.py, write the add function:
- And in
test_calculator.py, write the test for the add function that we conceptualised in the previous lesson, but use theassertkeyword in place of if statements and print functions:
PYTHON
# Import the add function so the test can use it
from calculator import add

def test_add():
    # Check that it adds two positive integers
    assert add(1, 2) == 3

    # Check that it adds zero
    assert add(5, 0) == 5

    # Check that it adds two negative integers
    assert add(-1, -2) == -3
The assert statement will crash the test by raising an
AssertionError if the condition following it is false.
Pytest uses these to tell that the test has failed.
This system of placing functions in a file and then tests for those functions in another file is a common pattern in software development. It allows you to keep your code organised and separate your tests from your actual code.
With Pytest, the expectation is to name your test files and functions
with the prefix test_. If you do so, Pytest will
automatically find and execute each test function.
Now, let’s run the test. We can do this by running the following command in the terminal:
(make sure you’re in the my_project directory before
running this command)
This command tells Pytest to run all the tests in the current directory.
When you run the test, you should see that the test runs successfully, indicated by some green. text in the terminal. We will go through the output and what it means in the next lesson, but for now, know that green means that the test passed, and red means that the test failed.
Try changing the add function to return the wrong value,
and run the test again to see that the test now fails and the text turns
red - neat! If this was
a real testing situation, we would know to investigate the
add function to see why it’s not behaving as expected.
Write a test for a multiply function
Try using what we have covered to write a test for a
multiply function that multiplies two numbers together.
- Place this multiply function in
calculator.py:
- Then write a test for this function in
test_calculator.py. Remember to import themultiplyfunction fromcalculator.pyat the top of the file like this:
There are many different test cases that you could include, but it’s important to check that different types of cases are covered. A test for this function could look like this:
- The
assertkeyword is used to check if a statement is true. - Pytest is invoked by running the command
pytest ./in the terminal. -
pytestwill run all the tests in the current directory, found by looking for files that start withtest_. - The output of a test is displayed in the terminal, with green text indicating a successful test and red text indicating a failed test.
- It’s best practice to write tests in a separate file from the code
they are testing. Eg:
scripts.pyandtest_scripts.py.
Content from Interacting with Tests
Last updated on 2026-07-21 | Edit this page
Overview
Questions
- How do I use pytest to run my tests?
- What does the output of pytest look like and how do I interpret it?
Objectives
- Understand how to run tests using pytest.
- Understand how to interpret the output of pytest.
Running pytest
As we saw in the previous lesson, you can invoke pytest using the
pytest terminal command. This searches within the current
directory (and any sub-directories) for files that start or end with
‘test’. For example: test_scripts.py,
scripts_test.py. It then searches for tests in these files,
which are functions (or classes) with names start with ‘test’, such as
the test_add function we made in the previous lesson.
So far, we should have a file called calculator.py with
an add and multiply function, and a file
called test_calculator.py with test_add and
test_multiply functions. If you are missing either of
these, they are listed in the previous lesson.
To show off pytest’s ability to search multiple files for tests,
let’s create a directory (folder) inside the current project directory
called advanced where we will add some advanced calculator
functionality.
- Create a directory called
advancedinside your project directory. - Inside this directory, create a file called
advanced_calculator.pyand a file calledtest_advanced_calculator.py.
Your project directory should now look like this:
project_directory/
│
├── calculator.py
├── test_calculator.py
│
└── advanced/
    ├── advanced_calculator.py
└── test_advanced_calculator.py- In the
advanced_calculator.pyfile, add the following code:
PYTHON
def power(value, exponent):
    """Raise a value to an exponent"""
    result = value
    for _ in range(exponent-1):
        result *= value
return result- In the
test_advanced_calculator.pyfile, add the following test:
PYTHON
from advanced_calculator import power

def test_power():
    """Test for the power function"""
    assert power(2, 3) == 8
assert power(3, 3) == 27- Now run
pytestin the terminal. You should see that all tests pass due to the green output.
Let’s have a closer look at the output of pytest.
Test output
When running pytest, there are usually two possible outcomes:
Case 1: All tests pass
Let’s break down the successful output in more detail.
=== test session starts ===- The first line tells us that pytest has started running tests.
platform linux -- Python 3.12.3, pytest-9.0.2, pluggy-1.6.0
- The next line just tells us the versions of several packages.
rootdir: /home/<userid>/.../python-testing-for-research/learners/files/03-interacting-with-tests
- The next line tells us where the tests are being searched for. In
this case, it is your project directory. So any file that starts or ends
with
testanywhere in this directory will be opened and searched for test functions.
plugins: snaptol-0.0.2- This tells us what plugins are being used. In my case, I have a
plugin called
snaptolthat is being used, but you may not. This is fine and you can ignore it.
collected 3 items- This simply tells us that 3 tests have been found and are ready to be run.
advanced/test_advanced_calculator.py .
test_calculator.py .. [100%]- These two lines tells us that the tests in
test_calculator.pyandadvanced/test_advanced_calculator.pyhave passed. Each.means that a test has passed. There are two of them besidetest_calculator.pybecause there are two tests intest_calculator.pyIf a test fails, it will show anFinstead of a..
=== 3 passed in 0.01s ===- This tells us that the 3 tests have passed in 0.01 seconds.
Case 2: Some or all tests fail
Now let’s look at the output when the tests fail. Edit a test in
test_calculator.py to make it fail (for example switching a
positive number to a negative number), then run pytest
again.
The start is much the same as before:
=== test session starts ===
platform linux -- Python 3.12.3, pytest-9.0.2, pluggy-1.6.0
rootdir: /home/<userid>/.../python-testing-for-research/learners/files/03-interacting-with-tests
plugins: snaptol-0.0.2
collected 3 items
But now we see that the tests have failed:
advanced/test_advanced_calculator.py .                                                                                                                                                                                                                                                                                                                                      [ 33%]
test_calculator.py F.
These F tells us that a test has failed. The output then
tells us which test has failed:
=== FAILURES ===

___ test_add ___
    def test_add():
        """Test for the add function"""
>       assert add(1, 2) == -3
E       assert 3 == -3
E       +  where 3 = add(1, 2)

test_calculator.py:7: AssertionError
This is where we get detailled information about what exactly broke in the test.
- The
>chevron points to the line that failed in the test. In this case, the assertionassert add(1, 2) == 3failed. - The following line tells us what the assertion tried to do. In this case, it tried to assert that the number 3 was equal to -3. Which of course it isn’t.
- The next line goes into more detail about why it tried to equate 3
to -3. It tells us that 3 is the result of calling
add(1, 2). - The final line tells us where the test failed. In this case, it was
on line 7 of
test_calculator.py.
Using this detailled output, we can quickly find the exact line that failed and know the inputs that caused the failure. From there, we can examine exactly what went wrong and fix it.
Finally, pytest prints out a short summary of all the failed tests:
=== short test summary info ===
FAILED test_calculator.py::test_add - assert 3 == -3
=== 1 failed, 2 passed in 0.01s ===
This tells us that one of our tests failed, and gives a short summary of what went wrong in this test and finally tells us that it took 0.01s to run the tests.
Errors in collection
If pytest encounters an error while collecting the tests, it will print out an error message and won’t run the tests. This happens when there is a syntax error in one of the test files, or if pytest can’t find the test files.
For example, if you remove the : from the end of the
def test_multiply(): function definition and run pytest,
you will see the following output:
=== test session starts ===
platform linux -- Python 3.12.3, pytest-9.0.2, pluggy-1.6.0
rootdir: /home/<userid>/.../python-testing-for-research/learners/files/03-interacting-with-tests
plugins: snaptol-0.0.2
collected 1 item / 1 error
=== ERRORS ===
___ ERROR collecting test_calculator.py ___
...
E     File "/home/<userid>/.../python-testing-for-research/learners/files/03-interacting-with-tests/test_calculator.py", line 14
E       def test_multiply()
E                          ^
E   SyntaxError: expected ':'
=== short test summary info ===
ERROR test_calculator.py
!!! Interrupted: 1 error during collection !!!
=== 1 error in 0.01s ===
This rather scary output is just telling us that there is a syntax error that needs fixing before the tests can be run.
Pytest options
Pytest has a number of options that can be used to customize how tests are run. It is very useful to know about these options as they can help you to run tests the way you want and get more information if necessary about a test run.
The verbose flag
The verbose flag -v can be used to get more detailed
output from pytest. This can be useful when you want to see more
information about the tests that are being run. For example, running
pytest -v will give you more information about the tests
that are being run, including the names of the tests and the files that
they are in.
The quiet flag
The quiet flag -q can be used to get less detailed
output from pytest. This can be useful when you want to see less
information about the tests that are being run. For example, running
pytest -q will give you less information about the tests
that are being run, including the names of the tests and the files that
they are in.
Running specific tests
In order to run a specific test, you can use the -k flag
followed by the name of the test you want to run. For example, to run
only the test_add test, you can run
pytest -k test_add. This will only run the
test_add test and ignore the test_multiply
test.
Alternatively you can call a specific test using this notation:
pytest test_calculator.py::test_add. This tells pytest to
only run the test_add test in the
test_calculator.py file.
Stopping after the first failure
If you want to stop running tests after the first failure, you can
use the -x flag. This will cause pytest to stop running
tests after the first failure. This is useful when you have lots of
tests that take a while to run.
Running tests that previously failed
If you don’t want to rerun your entire test suite after a single test
failure, the --lf flag will run only the ‘last failed’
tests. Alternatively, --ff will run the tests that failed
first.
Challenge - Experiment with pytest options
Try running pytest with the above options, editing the code to make the tests fail where necessary to see what happens.
Run
pytest -vto see more detailed output.Run
pytest -qto see less detailed output.Run
pytest -k test_addto run only thetest_addtest.Alternatively run
pytest test_calculator.py::test_addto run only thetest_addtest.Run
pytest -xto stop running tests after the first failure. (Make sure you have a failing test to see this in action).
- You can run multiple tests at once by running
pytestin the terminal. - Pytest searches for tests in files that start or end with ‘test’ in the current directory and subdirectories.
- The output of pytest tells you which tests have passed and which have failed and precisely why they failed.
- Pytest accepts many additional flags to change which tests are run, give more detailed output, etc.
Content from Unit tests & Testing Practices
Last updated on 2026-07-21 | Edit this page
Overview
Questions
- What to do about complex functions & tests?
- What are some testing best practices for testing?
- How far should I go with testing?
- How do I add tests to an existing project?
Objectives
- Be able to write effective unit tests for more complex functions
- Understand the AAA pattern for structuring tests
- Understand the benefits of test driven development
- Know how to handle randomness in tests
But what about complicated functions?
Some of the functions that you write will be more complex, resulting in tests that are very complex and hard to debug if they fail. Take this function as an example:
PYTHON
def process_data(data: list, maximum_value: float):

    # Remove negative values
    data_negative_removed = []
    for i in range(len(data)):
        if data[i] >= 0:
            data_negative_removed.append(data[i])

    # Remove values above the maximum value
    data_maximum_removed = []
    for i in range(len(data_negative_removed)):
        if data_negative_removed[i] <= maximum_value:
            data_maximum_removed.append(data_negative_removed[i])

    # Calculate the mean
    mean = sum(data_maximum_removed) / len(data_maximum_removed)

    # Calculate the standard deviation
    variance = sum([(x - mean) ** 2 for x in data_maximum_removed]) / len(data_maximum_removed)
    std_dev = variance ** 0.5

    return mean, std_dev
A test for this function might look like this:
PYTHON
def test_process_data():
    data = [1, 2, 3, 4, 5, 6, 7, 8, 9, 10]
    maximum_value = 5
    mean, std_dev = process_data(data, maximum_value)
    assert mean == 3
    assert std_dev == 1.5811388300841898
This test is hard to debug if it fails. Imagine if the calculation of the mean broke - the test would fail but it would not tell us what part of the function was broken, requiring us to check each function manually to find the bug. Not very efficient!
Asserting that the standard deviation is equal to 16 decimal places is also quite error prone. We’ll see in a later lesson how to improve this test.
Unit Testing
The process of unit testing is a fundamental part of software development. It is where you test individual units or components of a software instead of multiple things at once. For example, if you were adding tests to a car, you would want to test the wheels, the engine, the brakes, etc. separately to make sure they all work as expected before testing that the car could drive to the shops. The goal with unit testing is to validate that each unit of the software performs as designed. A unit is the smallest testable part of your code. A unit test usually has one or a few inputs and usually a single output.
The above function could usefully be broken down into smaller functions, each of which could be tested separately. This would make the tests easier to write and maintain.
PYTHON
def remove_negative_values(data: list):
    data_negatives_removed = []
    for i in range(len(data)):
        if data[i] >= 0:
            data_negatives_removed.append(data[i])
    return data

def remove_values_above_maximum(data: list, maximum_value: float):
    data_maximum_removed = []
    for i in range(len(data)):
        if data[i] <= maximum_value:
            data_maximum_removed.append(data[i])
    return data

def calculate_mean(data: list):
    return sum(data) / len(data)

def calculate_std_dev(data: list):
    mean = calculate_mean(data)
    variance = sum([(x - mean) ** 2 for x in data]) / len(data)
    return variance ** 0.5

def process_data(data: list, maximum_value: float):
    # Remove negative values
    data = remove_negative_values(data)
    # Remove values above the maximum value
    data = remove_values_above_maximum(data, maximum_value)
    # Calculate the mean
    mean = calculate_mean(data)
    # Calculate the standard deviation
    std_dev = calculate_std_dev(data)
    return mean, std_dev
Now we can write tests for each of these functions separately:
PYTHON
def test_remove_negative_values():
    data = [1, -2, 3, -4, 5, -6, 7, -8, 9, -10]
    assert remove_negative_values(data) == [1, 3, 5, 7, 9]

def test_remove_values_above_maximum():
    data = [1, 2, 3, 4, 5, 6, 7, 8, 9, 10]
    maximum_value = 5
    assert remove_values_above_maximum(data, maximum_value) == [1, 2, 3, 4, 5]

def test_calculate_mean():
    data = [1, 2, 3, 4, 5]
    assert calculate_mean(data) == 3

def test_calculate_std_dev():
    data = [1, 2, 3, 4, 5]
    assert calculate_std_dev(data) == 1.5811388300841898

def test_process_data():
    data = [1, 2, 3, 4, 5, 6, 7, 8, 9, 10]
    maximum_value = 5
    mean, std_dev = process_data(data, maximum_value)
    assert mean == 3
    assert std_dev == 1.5811388300841898
These tests are much easier to read and understand, and if one of them fails, it is much easier to see which part of the function is broken. This is the principle of unit testing: breaking down complex functions into smaller, testable units.
AAA pattern
When writing tests, it is a good idea to follow the AAA pattern:
- Arrange: Set up the data and the conditions for the test
- Act: Perform the action that you are testing
- Assert: Check that the result of the action is what you expect
It is a standard pattern in unit testing and is used in many testing frameworks. This makes your tests easier to read and understand for both yourself and others reading your code.
Test Driven Development (TDD)
Test Driven Development (TDD) is a software development process that focuses on writing tests before writing the code. This can have several benefits:
- It forces you to think about the requirements of the code before you write it, this is especially useful in research.
- It can help you to write cleaner, more modular code by breaking down complex functions into smaller, testable units.
- It can help you to catch bugs early in the development process.
Without the test driven development process, you might write the code first and then try to write tests for it afterwards. This can lead to tests that are hard to write and maintain, and can result in bugs that are hard to find and fix.
The TDD process usually follows these steps:
- Write a failing test
- Write the minimum amount of code to make the test pass
- Refactor the code to make it clean and maintainable
Here is an example of the TDD process:
- Write a failing test
PYTHON
def test_calculate_mean():
    # Arrange
    data = [1, 2, 3, 4, 5]

    # Act
    mean = calculate_mean(data)

    # Assert
assert mean == 3.5- Write the minimum amount of code to make the test pass
PYTHON
def calculate_mean(data: list):
    total = 0
    for i in range(len(data)):
        total += data[i]
    mean = total / len(data)
return mean- Refactor the code to make it clean and maintainable
This process can help you to write clean, maintainable code that is easy to test and debug.
Of course, in research, sometimes you might not know exactly what the requirements of the code are before you write it. In this case, you can still use the TDD process, but you might need to iterate on the tests and the code as you learn more about the problem you are trying to solve.
Randomness in tests
Some functions use randomness, which you might assume means we cannot write tests for them. However using random seeds, we can make this randomness deterministic and write tests for these functions.
PYTHON
import random

def random_number():
    return random.randint(1, 10)

def test_random_number():
    random.seed(0)
    assert random_number() == 1
    assert random_number() == 2
    assert random_number() == 3
Random seeds work by setting the initial state of the random number generator. This means that if you set the seed to the same value, you will get the same sequence of random numbers each time you run the function.
Challenge: Write your own unit tests
Take this complex function, break it down and write unit tests for it.
- Create a new directory called
statisticsin your project directory - Create a new file called
stats.pyin thestatisticsdirectory - Write the following function in
stats.py:
PYTHON
import random

def randomly_sample_and_filter_participants(
    participants: list,
    sample_size: int,
    min_age: int,
    max_age: int,
    min_height: int,
    max_height: int
):
    """Participants is a list of dicts, containing the age and height of each participant
    participants = [
        {age: 25, height: 180},
        {age: 30, height: 170},
        {age: 35, height: 160},
    ]
    """

    # Get the indexes to sample
    indexes = random.sample(range(len(participants)), sample_size)

    # Get the sampled participants
    sampled_participants = []
    for i in indexes:
        sampled_participants.append(participants[i])

    # Remove participants that are outside the age range
    sampled_participants_age_filtered = []
    for participant in sampled_participants:
        if participant['age'] >= min_age and participant['age'] <= max_age:
            sampled_participants_age_filtered.append(participant)

    # Remove participants that are outside the height range
    sampled_participants_height_filtered = []
    for participant in sampled_participants_age_filtered:
        if participant['height'] >= min_height and participant['height'] <= max_height:
            sampled_participants_height_filtered.append(participant)

return sampled_participants_height_filtered- Create a new file called
test_stats.pyin thestatisticsdirectory - Write unit tests for the
randomly_sample_and_filter_participantsfunction intest_stats.py
The function can be broken down into smaller functions, each of which can be tested separately:
PYTHON
import random

def sample_participants(
    participants: list,
    sample_size: int
):
    indexes = random.sample(range(len(participants)), sample_size)
    sampled_participants = []
    for i in indexes:
        sampled_participants.append(participants[i])
    return sampled_participants

def filter_participants_by_age(
    participants: list,
    min_age: int,
    max_age: int
):
    filtered_participants = []
    for participant in participants:
        if participant['age'] >= min_age and participant['age'] <= max_age:
            filtered_participants.append(participant)
    return filtered_participants

def filter_participants_by_height(
    participants: list,
    min_height: int,
    max_height: int
):
    filtered_participants = []
    for participant in participants:
        if participant['height'] >= min_height and participant['height'] <= max_height:
            filtered_participants.append(participant)
    return filtered_participants

def randomly_sample_and_filter_participants(
    participants: list,
    sample_size: int,
    min_age: int,
    max_age: int,
    min_height: int,
    max_height: int
):
    sampled_participants = sample_participants(participants, sample_size)
    age_filtered_participants = filter_participants_by_age(sampled_participants, min_age, max_age)
    height_filtered_participants = filter_participants_by_height(age_filtered_participants, min_height, max_height)
    return height_filtered_participants
Now we can write tests for each of these functions separately, remembering to set the random seed to make the randomness deterministic:
PYTHON
import random

def test_sample_participants():
    # set random seed
    random.seed(0)

    participants = [
        {'age': 25, 'height': 180},
        {'age': 30, 'height': 170},
        {'age': 35, 'height': 160},
    ]
    sample_size = 2
    sampled_participants = sample_participants(participants, sample_size)
    expected = [{'age': 30, 'height': 170}, {'age': 35, 'height': 160}]
    assert sampled_participants == expected

def test_filter_participants_by_age():
    participants = [
        {'age': 25, 'height': 180},
        {'age': 30, 'height': 170},
        {'age': 35, 'height': 160},
    ]
    min_age = 30
    max_age = 35
    filtered_participants = filter_participants_by_age(participants, min_age, max_age)
    expected = [{'age': 30, 'height': 170}, {'age': 35, 'height': 160}]
    assert filtered_participants == expected

def test_filter_participants_by_height():
    participants = [
        {'age': 25, 'height': 180},
        {'age': 30, 'height': 170},
        {'age': 35, 'height': 160},
    ]
    min_height = 160
    max_height = 170
    filtered_participants = filter_participants_by_height(participants, min_height, max_height)
    expected = [{'age': 30, 'height': 170}, {'age': 35, 'height': 160}]
    assert filtered_participants == expected

def test_randomly_sample_and_filter_participants():
    # set random seed
    random.seed(0)

    participants = [
        {"age": 25, "height": 180},
        {"age": 30, "height": 170},
        {"age": 35, "height": 160},
        {"age": 38, "height": 165},
        {"age": 40, "height": 190},
        {"age": 45, "height": 200},
    ]
    sample_size = 5
    min_age = 28
    max_age = 42
    min_height = 159
    max_height = 172
    filtered_participants = randomly_sample_and_filter_participants(
        participants, sample_size, min_age, max_age, min_height, max_height
    )
    expected = [{"age": 38, "height": 165}, {"age": 30, "height": 170}, {"age": 35, "height": 160}]
    assert filtered_participants == expected
These tests are much easier to read and understand, and if one of them fails, it is much easier to see which part of the function is broken.
Adding tests to an existing project
You may have an existing project that does not have any tests yet. Adding tests to an existing project can be a daunting task and it can be hard to know where to start.
In general, it’s a good idea to start by adding regression tests to your most important functions. Regression tests are tests that simply check that the output of a function doesn’t change when you make changes to the code. They don’t check the individual components of the functions like unit testing does.
For example if you had a long processing pipeline that returns a single number, 23 when provided a certain set of inputs, you could write a regression test that checks that the output is still 23 when you make changes to the code.
After adding regression tests, you can start adding unit tests to the individual functions in your code, starting with the more commonly used / likely to break functions such as ones that handle data processing or input/output.
Should we aim for 100% test coverage?
Although tests add reliability to your code, it’s not always practicable to spend so much development time writing tests. When time is limited, it’s often better to only write tests for the most critical parts of the code as opposed to rigorously testing every function.
You should discuss with your team how much of the code you think should be tested, and what the most critical parts of the code are in order to prioritize your time.
- Complex functions can be broken down into smaller, testable units.
- Testing each unit separately is called unit testing.
- The AAA pattern is a good way to structure your tests.
- Test driven development can help you to write clean, maintainable code.
- Randomness in tests can be made deterministic using random seeds.
- Adding tests to an existing project can be done incrementally, starting with regression tests.
Content from Testing for Exceptions
Last updated on 2026-07-21 | Edit this page
Overview
Questions
- How to check that a function raises an exception?
Objectives
- Learn how to test exceptions using
pytest.raises.
What to do about code that raises exceptions?
Sometimes you will want to make sure that a function raises an
exception when it should. For example, you might want to check that a
function raises a ValueError when it receives an invalid
input.
Take this example of the square_root function. We don’t
have time to implement complex numbers yet, so we can raise a
ValueError when the input is negative to crash a program
that tries to compute the square root of a negative number.
PYTHON
def square_root(x):
    if x < 0:
        raise ValueError("Cannot compute square root of negative number yet!")
    return x ** 0.5
We can test that the function raises an exception using
pytest.raises as follows:
PYTHON
import pytest

from advanced.advanced_calculator import square_root

def test_square_root():
    with pytest.raises(ValueError):
        square_root(-1)
Here, pytest.raises is a context manager that checks
that the code inside the with block raises a
ValueError exception. If it doesn’t, the test fails.
If you want to get more detailled with things, you can test what the error message says too:
PYTHON
def test_square_root():
    with pytest.raises(ValueError) as e:
        square_root(-1)
    assert str(e.value) == "Cannot compute square root of negative number yet!"
Challenge : Ensure that the divide function raises a ZeroDivisionError when the denominator is zero.
- Add a divide function to
calculator.py:
PYTHON
def divide(numerator, denominator):
    if denominator == 0:
        raise ZeroDivisionError("Cannot divide by zero!")
return numerator / denominator- Write a test in
test_calculator.pythat checks that the divide function raises aZeroDivisionErrorwhen the denominator is zero.
- Use
pytest.raisesto check that a function raises an exception.
Content from Floating Point Data
Last updated on 2026-07-21 | Edit this page
Overview
Questions
- What are the best practices when working with floating point data?
- How do you compare objects in libraries like
numpy?
Objectives
- Learn how to test floating point data with tolerances.
- Learn how to compare objects in libraries like
numpy.
Floating Point Data
Real numbers are encountered very frequently in research, but it’s
quite likely that they won’t be ‘nice’ numbers like 2.0 or 0.0. Instead,
the outcome of our code might be something like
2.34958124890e-31, and we may only be confident in that
answer to a certain precision.
Computers typically represent real numbers using a ‘floating point’ representation, which truncates their precision to a certain number of decimal places. Floating point arithmetic errors can cause a significant amount of noise in the last few decimal places. This can be affected by:
- Choice of algorithm.
- Precise order of operations.
- Inherent randomness in the calculation.
We could therefore test our code using
assert result == 2.34958124890e-31, but it’s possible that
this test could erroneously fail in future for reasons outside our
control. This lesson will teach best practices for handling this type of
data.
Libraries like NumPy, SciPy, and Pandas are commonly used to interact with large quantities of floating point numbers. NumPy provides special functions to assist with testing.
Relative and Absolute Tolerances
Rather than testing that a floating point number is exactly equal to another, it is preferable to test that it is within a certain tolerance. In most cases, it is best to use a relative tolerance:
PYTHON
from math import fabs

def test_float_rtol():
    expected = 7.31926e12  # Reference solution
    actual = my_function()
    rtol = 1e-3
    # Use fabs to ensure a positive result!
    assert fabs((actual - expected) / expected) < rtol
In some situations, such as testing a number is close to zero without caring about exactly how large it is, it is preferable to test within an absolute tolerance:
PYTHON
from math import fabs

def test_float_atol():
    expected = 0.0  # Reference solution
    actual = my_function()
    atol = 1e-5
    # Use fabs to ensure a positive result!
    assert fabs(actual - expected) < atol
Let’s practice with a function that estimates the value of pi (very inefficiently!).
Testing with tolerances
- Write this function to a file
estimate_pi.py:
PYTHON
import random

def estimate_pi(iterations):
    """
    Estimate pi by counting the number of random points
    inside a quarter circle of radius 1
    """
    num_inside = 0
    for _ in range(iterations):
        x = random.random()
        y = random.random()
        if x**2 + y**2 < 1:
            num_inside += 1
return 4 * num_inside / iterations- Add a file
test_estimate_pi.py, and include a test for this function using both absolute and relative tolerances. - Find an appropriate number of iterations so that the test finishes
quickly, but keep in mind that both
atolandrtolwill need to be modified accordingly!
PYTHON
import random
from math import fabs

from estimate_pi import estimate_pi

def test_estimate_pi():
    random.seed(0)
    expected = 3.141592654
    actual = estimate_pi(iterations=10000)
    # Test absolute tolerance
    atol = 1e-2
    assert fabs(actual - expected) < atol
    # Test relative tolerance
    rtol = 5e-3
    assert fabs((actual - expected) / expected) < rtol
In this case the absolute and relative tolerances should be similar, as the expected result is close in magnitude to 1.0, but in principle they could be very different!
The built-in function math.isclose can be used to
simplify these checks:
Both rel_tol and abs_tol may be provided,
and it will return True if either of the conditions are
satisfied.
Using math.isclose
- Adapt the test you wrote in the previous challenge to make use of
the
math.isclosefunction.
NumPy
NumPy is a common library used in research. Instead of the usual
assert a == b, NumPy has its own testing functions that are
more suitable for comparing NumPy arrays. These functions are the ones
you are most likely to use:
-
numpy.testing.assert_array_equalis used to compare two NumPy arrays for equality – best used for integer data. -
numpy.testing.assert_allcloseis used to compare two NumPy arrays with a tolerance for floating point numbers.
Here are some examples of how to use these functions:
PYTHON
def test_numpy_arrays():
    """Test that numpy arrays are equal"""
    # Create two numpy arrays
    array1 = np.array([1, 2, 3])
    array2 = np.array([1, 2, 3])
    # Check that the arrays are equal
    np.testing.assert_array_equal(array1, array2)

# Note that np.testing.assert_array_equal even works with multidimensional numpy arrays!

def test_2d_numpy_arrays():
    """Test that 2d numpy arrays are equal"""
    # Create two 2d numpy arrays
    array1 = np.array([[1, 2], [3, 4]])
    array2 = np.array([[1, 2], [3, 4]])
    # Check that the nested arrays are equal
    np.testing.assert_array_equal(array1, array2)

def test_numpy_arrays_with_tolerance():
    """Test that numpy arrays are equal with tolerance"""
    # Create two numpy arrays
    array1 = np.array([1.0, 2.0, 3.0])
    array2 = np.array([1.00009, 2.0005, 3.0001])
    # Check that the arrays are equal with tolerance
    np.testing.assert_allclose(array1, array2, atol=1e-3)
The NumPy testing functions can be used on anything NumPy considers to be ‘array-like’. This includes lists, tuples, and even individual floating point numbers if you choose. They can also be used for other objects in the scientific Python ecosystem, such as Pandas Series/DataFrames.
The Pandas library also provides its own testing functions:
pandas.testing.assert_frame_equalpandas.testing.assert_series_equal
These functions can also take rtol and atol
arguments, so can fulfill the role of both
numpy.testing.assert_array_equal and
numpy.testing.assert_allclose.
Checking if NumPy arrays are equal
In statistics/stats.py add this function to calculate
the cumulative sum of a NumPy array:
PYTHON
import numpy as np

def calculate_cumulative_sum(array: np.ndarray) -> np.ndarray:
    """Calculate the cumulative sum of a numpy array"""

    # don't use the built-in numpy function
    result = np.zeros(array.shape)
    result[0] = array[0]
    for i in range(1, len(array)):
        result[i] = result[i-1] + array[i]

    return result
Then write a test for this function by comparing NumPy arrays.
PYTHON
import numpy as np
from stats import calculate_cumulative_sum

def test_calculate_cumulative_sum():
    """Test calculate_cumulative_sum function"""
    array = np.array([1, 2, 3, 4, 5])
    expected_result = np.array([1, 3, 6, 10, 15])
np.testing.assert_array_equal(calculate_cumulative_sum(array), expected_result)- When comparing floating point data, you should use relative/absolute tolerances instead of testing for equality.
- Numpy arrays cannot be compared using the
==operator. Instead, usenumpy.testing.assert_array_equalandnumpy.testing.assert_allclose.
Content from Fixtures
Last updated on 2026-07-21 | Edit this page
Overview
Questions
- How to reuse data and objects in tests?
Objectives
- Learn how to use fixtures to store data and objects for use in tests.
Repetitiveness in tests
When writing more complex tests, you may find that you need to reuse data or objects across multiple tests.
Here is an example of a set of tests that re-use the same data a lot.
We have a class, Point, that represents a point in 2D
space. We have a few tests that check the behaviour of the class. Notice
how we have to repeat the exact same setup code in each test.
PYTHON
class Point:
    def __init__(self, x, y):
        self.x = x
        self.y = y

    def distance_from_origin(self):
        return (self.x ** 2 + self.y ** 2) ** 0.5

    def move(self, dx, dy):
        self.x += dx
        self.y += dy

    def reflect_over_x(self):
        self.y = -self.y

    def reflect_over_y(self):
        self.x = -self.x
PYTHON
def test_distance_from_origin():
    # Positive coordinates
    point_positive_coords = Point(3, 4)
    # Negative coordinates
    point_negative_coords = Point(-3, -4)
    # Mix of positive and negative coordinates
    point_mixed_coords = Point(-3, 4)

    assert point_positive_coords.distance_from_origin() == 5.0
    assert point_negative_coords.distance_from_origin() == 5.0
    assert point_mixed_coords.distance_from_origin() == 5.0

def test_move():
    # Repeated setup again...

    # Positive coordinates
    point_positive_coords = Point(3, 4)
    # Negative coordinates
    point_negative_coords = Point(-3, -4)
    # Mix of positive and negative coordinates
    point_mixed_coords = Point(-3, 4)

    # Test logic
    point_positive_coords.move(2, -1)
    point_negative_coords.move(2, -1)
    point_mixed_coords.move(2, -1)

    assert point_positive_coords.x == 5
    assert point_positive_coords.y == 3
    assert point_negative_coords.x == -1
    assert point_negative_coords.y == -5
    assert point_mixed_coords.x == -1
    assert point_mixed_coords.y == 3

def test_reflect_over_x():
    # Yet another setup repetition

    # Positive coordinates
    point_positive_coordinates = Point(3, 4)
    # Negative coordinates
    point_negative_coordinates = Point(-3, -4)
    # Mix of positive and negative coordinates
    point_mixed_coordinates = Point(-3, 4)

    # Test logic
    point_positive_coordinates.reflect_over_x()
    point_negative_coordinates.reflect_over_x()
    point_mixed_coordinates.reflect_over_x()

    assert point_positive_coordinates.x == 3
    assert point_positive_coordinates.y == -4
    assert point_negative_coordinates.x == -3
    assert point_negative_coordinates.y == 4
    assert point_mixed_coordinates.x == -3
    assert point_mixed_coordinates.y == -4


def test_reflect_over_y():
    # One more time...

    # Positive coordinates
    point_positive_coordinates = Point(3, 4)
    # Negative coordinates
    point_negative_coordinates = Point(-3, -4)
    # Mix of positive and negative coordinates
    point_mixed_coordinates = Point(-3, 4)

    # Test logic
    point_positive_coordinates.reflect_over_y()
    point_negative_coordinates.reflect_over_y()
    point_mixed_coordinates.reflect_over_y()

    assert point_positive_coordinates.x == -3
    assert point_positive_coordinates.y == 4
    assert point_negative_coordinates.x == 3
    assert point_negative_coordinates.y == -4
    assert point_mixed_coordinates.x == 3
    assert point_mixed_coordinates.y == 4
Fixtures
Pytest provides a way to store data and objects for use in tests - fixtures.
Fixtures are simply functions that return a value, and can be used in tests by passing them as arguments. Pytest magically knows that any test that requires a fixture as an argument should run the fixture function first, and pass the result to the test.
Fixtures are defined using the @pytest.fixture
decorator. (Don’t worry if you are not aware of decorators, they are
just ways of flagging functions to do something special - in this case,
to let pytest know that this function is a fixture.)
Here is a very simple fixture to demonstrate this:
PYTHON
import pytest

@pytest.fixture
def my_fixture():
    return "Hello, world!"

def test_my_fixture(my_fixture):
    assert my_fixture == "Hello, world!"
Here, Pytest will notice that my_fixture is a fixture
due to the @pytest.fixture decorator, and will run
my_fixture, then pass the result into
test_my_fixture.
Now let’s see how we can improve the tests for the Point
class using fixtures:
PYTHON
import pytest

@pytest.fixture
def point_positive_3_4():
    return Point(3, 4)

@pytest.fixture
def point_negative_3_4():
    return Point(-3, -4)

@pytest.fixture
def point_mixed_3_4():
    return Point(-3, 4)

def test_distance_from_origin(point_positive_3_4, point_negative_3_4, point_mixed_3_4):
    assert point_positive_3_4.distance_from_origin() == 5.0
    assert point_negative_3_4.distance_from_origin() == 5.0
    assert point_mixed_3_4.distance_from_origin() == 5.0

def test_move(point_positive_3_4, point_negative_3_4, point_mixed_3_4):
    point_positive_3_4.move(2, -1)
    point_negative_3_4.move(2, -1)
    point_mixed_3_4.move(2, -1)

    assert point_positive_3_4.x == 5
    assert point_positive_3_4.y == 3
    assert point_negative_3_4.x == -1
    assert point_negative_3_4.y == -5
    assert point_mixed_3_4.x == -1
    assert point_mixed_3_4.y == 3

def test_reflect_over_x(point_positive_3_4, point_negative_3_4, point_mixed_3_4):
    point_positive_3_4.reflect_over_x()
    point_negative_3_4.reflect_over_x()
    point_mixed_3_4.reflect_over_x()

    assert point_positive_3_4.x == 3
    assert point_positive_3_4.y == -4
    assert point_negative_3_4.x == -3
    assert point_negative_3_4.y == 4
    assert point_mixed_3_4.x == -3
    assert point_mixed_3_4.y == -4

def test_reflect_over_y(point_positive_3_4, point_negative_3_4, point_mixed_3_4):
    point_positive_3_4.reflect_over_y()
    point_negative_3_4.reflect_over_y()
    point_mixed_3_4.reflect_over_y()

    assert point_positive_3_4.x == -3
    assert point_positive_3_4.y == 4
    assert point_negative_3_4.x == 3
    assert point_negative_3_4.y == -4
    assert point_mixed_3_4.x == 3
    assert point_mixed_3_4.y == 4
With the setup code defined in the fixtures, the tests are more concise and it won’t take as much effort to add more tests in the future.
Challenge : Write your own fixture
In the unit testing lesson, we wrote several tests for sampling & filtering data. We turned a complex function into a properly unit tested set of functions which greatly improved the readability and maintainability of the code, however we had to repeat the same setup code in each test.
Code:
PYTHON
def sample_participants(participants: list, sample_size: int):
    indexes = random.sample(range(len(participants)), sample_size)
    sampled_participants = []
    for i in indexes:
        sampled_participants.append(participants[i])
    return sampled_participants


def filter_participants_by_age(participants: list, min_age: int, max_age: int):
    filtered_participants = []
    for participant in participants:
        if participant["age"] >= min_age and participant["age"] <= max_age:
            filtered_participants.append(participant)
    return filtered_participants


def filter_participants_by_height(participants: list, min_height: int, max_height: int):
    filtered_participants = []
    for participant in participants:
        if participant["height"] >= min_height and participant["height"] <= max_height:
            filtered_participants.append(participant)
    return filtered_participants


def randomly_sample_and_filter_participants(
    participants: list, sample_size: int, min_age: int, max_age: int, min_height: int, max_height: int
):
    sampled_participants = sample_participants(participants, sample_size)
    age_filtered_participants = filter_participants_by_age(sampled_participants, min_age, max_age)
    height_filtered_participants = filter_participants_by_height(age_filtered_participants, min_height, max_height)
    return height_filtered_participants
Tests:
PYTHON
import random
from stats import sample_participants, filter_participants_by_age, filter_participants_by_height, randomly_sample_and_filter_participants

def test_sample_participants():
    # set random seed
    random.seed(0)

    participants = [
        {"age": 25, "height": 180},
        {"age": 30, "height": 170},
        {"age": 35, "height": 160},
        {"age": 38, "height": 165},
        {"age": 40, "height": 190},
        {"age": 45, "height": 200},
    ]
    sample_size = 2
    sampled_participants = sample_participants(participants, sample_size)
    expected = [{"age": 38, "height": 165}, {"age": 45, "height": 200}]
    assert sampled_participants == expected


def test_filter_participants_by_age():
    participants = [
        {"age": 25, "height": 180},
        {"age": 30, "height": 170},
        {"age": 35, "height": 160},
        {"age": 38, "height": 165},
        {"age": 40, "height": 190},
        {"age": 45, "height": 200},
    ]
    min_age = 30
    max_age = 35
    filtered_participants = filter_participants_by_age(participants, min_age, max_age)
    expected = [{"age": 30, "height": 170}, {"age": 35, "height": 160}]
    assert filtered_participants == expected


def test_filter_participants_by_height():
    participants = [
        {"age": 25, "height": 180},
        {"age": 30, "height": 170},
        {"age": 35, "height": 160},
        {"age": 38, "height": 165},
        {"age": 40, "height": 190},
        {"age": 45, "height": 200},
    ]
    min_height = 160
    max_height = 170
    filtered_participants = filter_participants_by_height(participants, min_height, max_height)
    expected = [{"age": 30, "height": 170}, {"age": 35, "height": 160}, {"age": 38, "height": 165}]
    assert filtered_participants == expected


def test_randomly_sample_and_filter_participants():
    # set random seed
    random.seed(0)

    participants = [
        {"age": 25, "height": 180},
        {"age": 30, "height": 170},
        {"age": 35, "height": 160},
        {"age": 38, "height": 165},
        {"age": 40, "height": 190},
        {"age": 45, "height": 200},
    ]
    sample_size = 5
    min_age = 28
    max_age = 42
    min_height = 159
    max_height = 172
    filtered_participants = randomly_sample_and_filter_participants(
        participants, sample_size, min_age, max_age, min_height, max_height
    )
    expected = [{"age": 38, "height": 165}, {"age": 30, "height": 170}, {"age": 35, "height": 160}]
assert filtered_participants == expected- Try making these tests more concise by creating a fixture for the input data.
PYTHON
import pytest

@pytest.fixture
def participants():
    return [
        {"age": 25, "height": 180},
        {"age": 30, "height": 170},
        {"age": 35, "height": 160},
        {"age": 38, "height": 165},
        {"age": 40, "height": 190},
        {"age": 45, "height": 200},
    ]

def test_sample_participants(participants):
    # set random seed
    random.seed(0)

    sample_size = 2
    sampled_participants = sample_participants(participants, sample_size)
    expected = [{"age": 38, "height": 165}, {"age": 45, "height": 200}]
    assert sampled_participants == expected

def test_filter_participants_by_age(participants):
    min_age = 30
    max_age = 35
    filtered_participants = filter_participants_by_age(participants, min_age, max_age)
    expected = [{"age": 30, "height": 170}, {"age": 35, "height": 160}]
    assert filtered_participants == expected

def test_filter_participants_by_height(participants):
    min_height = 160
    max_height = 170
    filtered_participants = filter_participants_by_height(participants, min_height, max_height)
    expected = [{"age": 30, "height": 170}, {"age": 35, "height": 160}, {"age": 38, "height": 165}]
    assert filtered_participants == expected

def test_randomly_sample_and_filter_participants(participants):
    # set random seed
    random.seed(0)

    sample_size = 5
    min_age = 28
    max_age = 42
    min_height = 159
    max_height = 172
    filtered_participants = randomly_sample_and_filter_participants(
        participants, sample_size, min_age, max_age, min_height, max_height
    )
    expected = [{"age": 38, "height": 165}, {"age": 30, "height": 170}, {"age": 35, "height": 160}]
    assert filtered_participants == expected
Fixtures also allow you to set up and tear down resources that are needed for tests, such as database connections, files, or servers, but those are more advanced topics that we won’t cover here.
Fixture organisation
Fixtures can be placed in the same file as the tests, or in a
separate file. If you have a lot of fixtures, it may be a good idea to
place them in a separate file to keep your test files clean. It is
common to place fixtures in a file called conftest.py in
the same directory as the tests.
For example you might have this structure:
project_directory/
│
├── tests/
│   ├── conftest.py
│   ├── test_my_module.py
│   ├── test_my_other_module.py
│
├── my_module.py
├── my_other_module.py
In this case, the fixtures defined in conftest.py can be
used in any of the test files in the tests directory,
provided that the fixtures are imported.
- Fixtures are useful way to store data, objects and automations to re-use them in many different tests.
- Fixtures are defined using the
@pytest.fixturedecorator. - Tests can use fixtures by passing them as arguments.
- Fixtures can be placed in a separate file or in the same file as the tests.
Content from Parametrization
Last updated on 2026-07-21 | Edit this page
Overview
Questions
- Is there a better way to test a function with lots of different inputs than writing a separate test for each one?
Objectives
- Understand how to use parametrization in pytest to run the same test with different parameters in a concise and more readable way.
Parametrization
When writing tests for functions that need to test lots of different combinations of inputs, this can take a lot of space and be quite verbose. Parametrization is a way to run the same test with different parameters in a concise and more readable way.
To use parametrization in pytest, you need to use the
@pytest.mark.parametrize decorator (don’t worry if you
don’t know what this means). This decorator takes two arguments: the
name of the parameters and the list of values you want to test.
Consider the following example:
We have a Triangle class that has a function to calculate the triangle’s area from its side lengths.
PYTHON
class Point:
    def __init__(self, x, y):
        self.x = x
        self.y = y

class Triangle:
    def __init__(self, p1: Point, p2: Point, p3: Point):
        self.p1 = p1
        self.p2 = p2
        self.p3 = p3

    def calculate_area(self):
        a = ((self.p1.x * (self.p2.y - self.p3.y)) +
             (self.p2.x * (self.p3.y - self.p1.y)) +
             (self.p3.x * (self.p1.y - self.p2.y))) / 2
        return abs(a)
If we want to test this function with different combinations of sides, we could write a test like this:
PYTHON
def test_calculate_area():
    """Test the calculate_area function of the Triangle class"""

    # Equilateral triangle
    p11 = Point(0, 0)
    p12 = Point(2, 0)
    p13 = Point(1, 1.7320)
    t1 = Triangle(p11, p12, p13)
    assert t1.calculate_area() == 1.7320

    # Right-angled triangle
    p21 = Point(0, 0)
    p22 = Point(3, 0)
    p23 = Point(0, 4)
    t2 = Triangle(p21, p22, p23)
    assert t2.calculate_area() == 6

    # Isosceles triangle
    p31 = Point(0, 0)
    p32 = Point(4, 0)
    p33 = Point(2, 8)
    t3 = Triangle(p31, p32, p33)
    assert t3.calculate_area() == 16

    # Scalene triangle
    p41 = Point(0, 0)
    p42 = Point(3, 0)
    p43 = Point(1, 4)
    t4 = Triangle(p41, p42, p43)
    assert t4.calculate_area() == 6

    # Negative values
    p51 = Point(0, 0)
    p52 = Point(-3, 0)
    p53 = Point(0, -4)
    t5 = Triangle(p51, p52, p53)
    assert t5.calculate_area() == 6
This test is quite long and repetitive. We can use parametrization to make it more concise:
PYTHON
import pytest

@pytest.mark.parametrize(
    "p1x, p1y, p2x, p2y, p3x, p3y, expected",
    [
        pytest.param(0, 0, 2, 0, 1, 1.732, 1.732, id="Equilateral triangle"),
        pytest.param(0, 0, 3, 0, 0, 4, 6, id="Right-angled triangle"),
        pytest.param(0, 0, 4, 0, 2, 8, 16, id="Isosceles triangle"),
        pytest.param(0, 0, 3, 0, 1, 4, 6, id="Scalene triangle"),
        pytest.param(0, 0, -3, 0, 0, -4, 6, id="Negative values")
    ]
)
def test_calculate_area(p1x, p1y, p2x, p2y, p3x, p3y, expected):
    p1 = Point(p1x, p1y)
    p2 = Point(p2x, p2y)
    p3 = Point(p3x, p3y)
    t = Triangle(p1, p2, p3)
    assert t.calculate_area() == expected
Let’s have a look at how this works.
Similar to how fixtures are defined, the
@pytest.mark.parametrize line is a decorator, letting
pytest know that this is a parametrized test.
The first argument is a string listing the names of the parameters you want to use in your test. For example
"p1x, p2y, p2x, p2y, p3x, p3y, expected"means that we will use the parametersp1x,p1y,p2x,p2y,p3x,p3yandexpectedin our test.The second argument is a list of
pytest.paramobjects. Eachpytest.paramobject contains the values you want to test, with an optionalidargument to give a name to the test.
For example,
pytest.param(0, 0, 2, 0, 1, 1.732, 1.732, id="Equilateral triangle")
means that we will test the function with the parameters
0, 0, 2, 0, 1, 1.732, 1.732 and give it the name
“Equilateral triangle”.
Note that if the test fails you will see the id in the output, so it’s useful to give them meaningful names to help you understand what went wrong.
The test function will be run once for each set of parameters in the list.
Inside the test function, you can use the parameters as you would any other variable.
This is a much more concise way to write tests for functions that need to be tested with lots of different inputs, especially when there is a lot of repetition in the setup for each of the different test cases.
Practice with Parametrization
Add the following function to
advanced/advanced_calculator.py and write a parametrized
test for it in tests/test_advanced_calculator.py that tests
the function with a range of different inputs using parametrization.
PYTHON
import pytest

@pytest.mark.parametrize(
    "n, expected",
    [
        pytest.param(0, False, id="0 is not prime"),
        pytest.param(1, False, id="1 is not prime"),
        pytest.param(2, True, id="2 is prime"),
        pytest.param(3, True, id="3 is prime"),
        pytest.param(4, False, id="4 is not prime"),
        pytest.param(5, True, id="5 is prime"),
        pytest.param(6, False, id="6 is not prime"),
        pytest.param(7, True, id="7 is prime"),
        pytest.param(8, False, id="8 is not prime"),
        pytest.param(9, False, id="9 is not prime"),
        pytest.param(10, False, id="10 is not prime"),
        pytest.param(11, True, id="11 is prime"),
        pytest.param(12, False, id="12 is not prime"),
        pytest.param(13, True, id="13 is prime"),
        pytest.param(14, False, id="14 is not prime"),
        pytest.param(15, False, id="15 is not prime"),
        pytest.param(16, False, id="16 is not prime"),
        pytest.param(17, True, id="17 is prime"),
        pytest.param(18, False, id="18 is not prime"),
        pytest.param(19, True, id="19 is prime"),
        pytest.param(20, False, id="20 is not prime"),
        pytest.param(21, False, id="21 is not prime"),
        pytest.param(22, False, id="22 is not prime"),
        pytest.param(23, True, id="23 is prime"),
        pytest.param(24, False, id="24 is not prime"),
    ]
)
def test_is_prime(n, expected):
assert is_prime(n) == expected- Parametrization is a way to run the same test with different parameters in a concise and more readable way, especially when there is a lot of repetition in the setup for each of the different test cases.
- Use the
@pytest.mark.parametrizedecorator to define a parametrized test.
Content from Regression Tests
Last updated on 2026-07-21 | Edit this page
Overview
Questions
- How can we detect changes in program outputs?
- How can snapshots make this easier?
Objectives
- Explain what regression tests are and when they’re useful
- Write a manual regression test (save output and compare later)
- Use Snaptol snapshots to simplify output/array regression testing
- Use tolerances (rtol/atol) to handle numerical outputs safely
1) Introduction
In short, a regression test asks “this test used to produce X, does it still produce X?”. This can help us detect unexpected or unwanted changes in the output of a program.
They are particularly useful,
when beginning to add tests to an existing project,
when adding unit tests to all parts of a project is not feasible,
to quickly give a good test coverage,
when it does not matter if the output is correct or not.
These types of tests are not a substitute for unit tests, but rather are complimentary.
2) Manual example
Let’s make a regression test in a test.py file. It is
going to utilise a “very complex” processing function to simulate the
processing of data,
PYTHON
# test.py

def very_complex_processing(data: list):
    return [x ** 2 - 10 * x + 42 for x in data]
Let’s write the basic structure for a test with example input data, but for now we will simply print the output,
PYTHON
# test.py continued

def test_something():
    input_data = [i for i in range(8)]

    processed_data = very_complex_processing(input_data)

    print(processed_data)
Let’s run pytest with reduced verbosity -q
and print the statement from the test -s,
$ pytest -qs test.py
[42, 33, 26, 21, 18, 17, 18, 21]
.
1 passed in 0.00s
We get a list of output numbers that simulate the result of a complex
function in our project. Let’s save this data at the top of our
test.py file so that we can assert that it is
always equal to the output of the processing function,
PYTHON
# test.py

SNAPSHOT_DATA = [42, 33, 26, 21, 18, 17, 18, 21]

def very_complex_processing(data: list):
    return [x ** 2 - 10 * x + 42 for x in data]

def test_something():
    input_data = [i for i in range(8)]

    processed_data = very_complex_processing(input_data)

    assert SNAPSHOT_DATA == processed_data
We call the saved version of the data a “snapshot”.
We can now be assured that any development of the code that
erroneously alters the output of the function will cause the test to
fail. For example, suppose we slightly altered the
very_complex_processing function,
PYTHON
def very_complex_processing(data: list):
    return [3 * x ** 2 - 10 * x + 42 for x in data]
#           ^^^^ small change
Then, running the test causes it to fail,
$ pytest -q test.py
F
__________________________________ FAILURES _________________________________
_______________________________ test_something ______________________________

    def test_something():
        input_data = [i for i in range(8)]

        processed_data = very_complex_processing(input_data)

>       assert SNAPSHOT_DATA == processed_data
E       assert [42, 33, 26, 21, 18, 17, ...] == [42, 35, 34, 39, 50, 67, ...]
E         At index 1 diff: 33 != 35

test.py:12: AssertionError
1 failed in 0.03s
If the change was intentional, then we could print the output again
and update SNAPSHOT_DATA. Otherwise, we would want to
investigate the cause of the change and fix it.
3) Snaptol
So far, performing a regression test manually has been a bit tedious. Storing the output data at the top of our test file,
adds clutter,
is laborious,
is prone to errors.
We could move the data to a separate file, but once again we would have to handle its contents manually.
There are tools out there that can handle this for us, one widely known is Syrupy. A new tool has also been developed called Snaptol, that we will use here.
Let’s use the original very_complex_processing function,
and introduce the snaptolshot fixture,
PYTHON
# test.py

def very_complex_processing(data: list):
    return [x ** 2 - 10 * x + 42 for x in data]

def test_something(snaptolshot):
    input_data = [i for i in range(8)]

    processed_data = very_complex_processing(input_data)

    assert snaptolshot == processed_data
Notice that we have replaced the SNAPSHOT_DATA variable
with snaptolshot, which is an object provided by Snaptol
that can handle the snapshot file management, amongst other smart
features, for us.
When we run the test for the first time, we will be met with a
FileNotFoundError,
$ pytest -q test.py
F
================================== FAILURES =================================
_______________________________ test_something ______________________________

    def test_something(snaptolshot):
        input_data = [i for i in range(8)]

        processed_data = very_complex_processing(input_data)

>       assert snaptolshot == processed_data
               ^^^^^^^^^^^^^^^^^^^^^^^^^^^^^

test.py:10:
_ _ _ _ _ _ _ _ _ _ _ _ _ _ _ _ _ _ _ _ _ _ _ _ _ _ _ _ _ _ _ _ _ _ _ _ _ _ _
.../snapshot.py:167: FileNotFoundError
========================== short test summary info ==========================
FAILED test.py::test_something - FileNotFoundError: Snapshot file not found.
1 failed in 0.03s
This is because we have not yet created the snapshot file. Let’s run
snaptol in update mode so that it knows to create the
snapshot file for us. This is similar to the print, copy and paste step
in the manual approach above,
$ pytest -q test.py --snaptol-update
.
1 passed in 0.00s
This tells us that the test performed successfully, and, because we
were in update mode, an associated snapshot file was created with the
name format <test_file>.<test_name>.json in a
dedicated directory,
$ tree
.
├── __snapshots__
│   └── test.test_something.json
└── test.py
The contents of the JSON file are the same as in the manual example,
As the data is saved in JSON format, almost any Python object can be used in a snapshot test – not just integers and lists.
Just as previously, if we alter the function then the test will fail.
We can similarly update the snapshot file with the new output with the
--snaptol-update flag as above.
Note: --snaptol-update will only update
snapshot files for tests that failed in the previous run of
pytest. This is because the expected workflow is 1) run
pytest, 2) observe a test failure, 3) if happy with the
change then run the update, --snaptol-update. This stops
the unnecessary rewrite of snapshot files in tests that pass – which is
particularly important when we allow for tolerance as explained in the
next section.
Floating point numbers
Consider a simulation code that uses algorithms that depend on convergence – perhaps a complicated equation that does not have an exact answer but can be approximated numerically within a given tolerance. This, along with the common use of controlled randomised initial conditions, can lead to results that differ slightly between runs.
In the example below, we use the estimate_pi function
from the “Floating Point Data” module. It relies on the use of
randomised input and as a result the determined value will vary slightly
between runs.
PYTHON
# test_tol.py
import random

def estimate_pi(iterations):
    num_inside = 0
    for _ in range(iterations):
        x = random.random()
        y = random.random()
        if x**2 + y**2 < 1:
            num_inside += 1
    return 4 * num_inside / iterations

def test_something(snaptolshot):
    result = estimate_pi(10000000)

    print(result)

    snaptolshot.assert_allclose(result, rtol=1e-03, atol=0.0)
Notice that here we use a method of the snaptolshot
object called assert_allclose. This is a wrapper around the
numpy.testing.assert_allclose function, as discussed in the
“Floating Point Data” module, and allows us to specify tolerances for
the comparison rather than asserting an exact equality.
Let’s run the test initially like before but create the snapshot file straight away by running in update mode,
$ pytest -qs test_tol.py --snaptol-update-all
3.1423884
.
1 passed in 0.30s
Even with ten million data points, the approximation of pi, 3.1423884, isn’t great!
Note: remember that the result of a regression test is not the important part, but rather on how that result changes in future runs. We want to focus on whether our code reproduces the result in future runs – in this case within a given tolerance to account for the randomness.
In the test above, we supplied rtol and
atol arguments to the function in the assertion. These are
used to control the tolerance of the comparison between the snapshot and
the actual output. This means on future runs of the test, the computed
value will not be required to exactly match the snapshot, but rather
within the given tolerance. Remember,
-
rtolis the relative tolerance, useful for handling large numbers (e.g magnitude much greater than 1), -
atolis the absolute tolerance, useful for numbers “near zero” (e.g magnitude much less than 1).
If we run the test again, we see the printed output is different to that saved to file, but the test still passes,
$ pytest -qs test_tol.py
3.1408724
.
1 passed in 0.24s
Exercises
Create your own regression test
Add the below code to a new file and add your own code to the
...sections.On the first run, capture the output of your implemented
very_complex_processingfunction and store it appropriately.After, ensure the test compares the stored data to the result, and passes successfully. Avoid using
floats for now.
Implement a regression test with Snaptol
Using the
estimate_pifunction above, implement a regression test using thesnaptolshotobject.Ensure to use the
assert_allclosemethod to compare the result to the snapshot carefully.On the first pass, ensure that it fails due to a
FileNotFoundError.Run it in update mode to save the snapshot, and ensure it passes successfuly on future runs.
PYTHON
import random

def estimate_pi(iterations):
    num_inside = 0
    for _ in range(iterations):
        x = random.random()
        y = random.random()
        if x**2 + y**2 < 1:
            num_inside += 1
    return 4 * num_inside / iterations

def test_something(snaptolshot):
    result = estimate_pi(10000000)

snaptolshot.assert_allclose(result, rtol=1e-03, atol=0.0)More complex regression tests
Create two separate tests that both utilise the
estimate_pifunction as a fixture.Using different tolerances for each test, assert that the first passes successfully, and assert that the second raises an
AssertionError. Hints: 1) remember to look back at the “Testing for Exceptions” and “Fixtures” modules, 2) the error in the pi calculation algorithm is \(\frac{1}{\sqrt{N}}\) where \(N\) is the number of points used.
PYTHON
import random
import pytest

@pytest.fixture
def estimate_pi():
    iterations = 10000000
    num_inside = 0
    for _ in range(iterations):
        x = random.random()
        y = random.random()
        if x**2 + y**2 < 1:
            num_inside += 1
    return 4 * num_inside / iterations

def test_pi_passes(snaptolshot, estimate_pi):
    # Passes due to loose tolerance.
    snaptolshot.assert_allclose(estimate_pi, rtol=1e-03, atol=0.0)

def test_pi_fails(snaptolshot, estimate_pi):
    # Fails due to tight tolerance.
    with pytest.raises(AssertionError):
snaptolshot.assert_allclose(estimate_pi, rtol=1e-04, atol=0.0)- Regression testing ensures that the output of a function remains consistent between test runs.
- The
pytestplugin,snaptol, can be used to simplify this process and cater for floating point numbers that may need tolerances on assertion checks.
Content from Continuous Integration with GitHub Actions
Last updated on 2026-07-21 | Edit this page
Overview
Questions
- How can I automate the testing of my code?
- What are GitHub Actions?
Objectives
- Understand the concept of continuous integration
- Learn how to use GitHub Actions to automate the testing of your code
Continuous Integration
Continuous Integration (CI) is the practice of automating the merging of code changes into a project. In the context of software testing, CI is the practice of running tests on every code change to ensure that the code is working as expected. GitHub provides a feature called GitHub Actions that allows you to integrate this into your projects.
In this lesson we will go over the basics of how to set up a GitHub Action to run tests on your code.
This lesson assumes a working knowledge of Git and GitHub. If you get stuck, you may find it helpful to review the Research Coding Course’s material on version control
Setting up your project repository
- Create a new repository on GitHub for this lesson called “python-testing-course” (whatever you like really). We recommended making it public for now.
- Clone the repository into your local machine using
git clone <repository-url>or via Github Desktop. - Move over all your code from the previous lessons into this repository.
- Commit the changes using
git add .andgit commit -m "Add all the project code" - Create a new file called
requirements.txtin the root of your repository and add the following contents:
pytest
numpy
snaptol
This is just a list of all the packages that your project uses and will be needed later. Recall that each of these are used in various lessons in this course.
Nowadays it is usually preferable to list dependencies in a file
called pyproject.toml, which also allows Python packages to
be installed and published. Look out for our upcoming course on
reproducible environments to learn more!
Now we have a repository with all our code in it online on GitHub.
Creating a GitHub Action
GitHub Actions are defined in yaml files – a structured
text file which is commonly used to pass settings to programs. They are
stored in the .github/workflows directory in your
repository.
- Create a new directory in your repository called
.github - Inside the
.githubdirectory, create a new directory calledworkflows - Inside the
workflowsdirectory, create a new file calledtests.yaml
This test.yaml file is where you will tell GitHub how to
run the tests for your code.
Let’s add some instructions to the tests.yaml file:
YAML
# This is just the name of the action, you can call it whatever you like.
name: Tests (pytest)

# This sets the events that trigger the action. In this case, we are telling
# GitHub to run the tests whenever a push is made to the repository.
# The trailing colon is intentional!
on:
  push:

# This is a list of jobs that the action will run. In this case, we have only
# one job called test.
jobs:

  # This is the name of the job
  test:

    # This is the environment that the job will run on. In this case, we are
    # using the latest version of Ubuntu, however you can use other operating
    # systems like Windows or MacOS if you like!
    runs-on: ubuntu-latest

    # This is a list of steps that the job will run. Each step is a command
    # that will be executed on the environment.
    steps:

      # This command tells GitHub to use a pre-built action. In this case, we
      # are using the actions/checkout action to check out the repository. This
      # just means that GitHub will clone this repository to the current
      # working directory.
      - uses: actions/checkout@v6

      # This is the name of the step. This is just a label that will be
      # displayed in the GitHub UI.
      - name: Set up Python 3.12
        # This command tells GitHub to use a pre-built action. In this case, we
        # are using the actions/setup-python action to set up Python 3.12.
        uses: actions/setup-python@v6
        with:
            python-version: "3.12"

      # This step installs the dependencies for the project such as pytest,
      # numpy, pandas, etc using the requirements.txt file we created earlier.
      - name: Install dependencies
        run: |
          python -m pip install --upgrade pip
          pip install -r requirements.txt

      # This step runs the tests using the pytest command.
      - name: Run tests
        run: |
          pytest
This is a simple GitHub Action that runs the tests for your code whenever code is pushed to the repository, regardless of what was changed in the repository or which branch you push too. We’ll see later how to run tests only when certain criteria are fulfilled.
Upload the workflow to GitHub
Now that you have created the tests.yaml file, you need
to upload it to GitHub.
- Commit the changes using
git add .andgit commit -m "Add GitHub Action to run tests" - Push the changes to GitHub using
git push
This should trigger a workflow on the repository. While it’s running, you’ll see an orange circle next to your profile name at the top of the repo. When it’s done, it’ll change to a green tick if it finished successfully, or a red cross if it didn’t.
You can view all previous workflow runs by clicking the ‘Actions’ button on the top bar of your repository.

If you click on the orange circle/green tick/red cross, you can also view the individual stages of the workflow and inspect the terminal output.

Testing across multiple platforms
A very useful feature of GitHub Actions is the ability to test over a wider range of platforms than just your own machine:
- Operating systems
- Python versions
- Compiler versions (for those writing C/C++/Fortran/etc)
We can achieve this by setting
jobs.<job_id>.strategy.matrix in our workflow:
YAML
jobs:
  test:
    strategy:
      matrix:
        python_version: ["3.12", "3.13", "3.14"]
        os: ["ubuntu-latest", "windows-latest"]
    runs-on: ${{ matrix.os }}
    steps:
      ...
Later in the file, the setup-python step should be
changed to:
YAML
      - name: Set up Python ${{ matrix.python_version }}
        uses: actions/setup-python@v6
        with:
            python-version: ${{ matrix.python_version }}
By default, all combinations in the matrix will be run in separate
jobs. The syntax ${{ matrix.x }} inserts the text from the
x list for the given matrix job.
Upgrade the workflow to run across multiple platforms
- Make the changes above to your workflow file, being careful to get the indentation right!
- Commit the changes and push to GitHub.
- Check the latest jobs in the Actions panel.
You should see that a total of 6 jobs have run, and hopefully all will have passed!
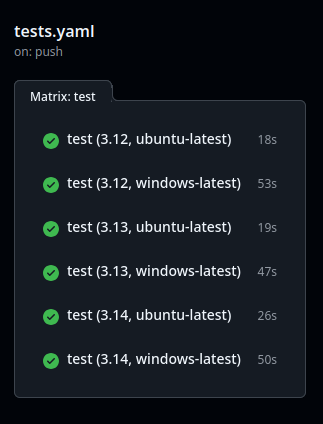
This ensures that code that runs on your machine should, in theory, run on many other peoples’ machines too. However, it’s best to restrict the matrix to the minimum number of necessary platforms to ensure you don’t waste resources. You can do so with a list of exclusions:
Running on other events
You may have wondered why there is a trailing colon when we specify
push: at the top of the file. The reason is that we can
optionally set additional conditions on when CI jobs will run. For
example:
YAML
on:
  push:
    # Only check when Python files are changed.
    # Don't need to check when the README is updated!
    paths:
      - '**.py'
      - 'pyproject.toml'
    # Only check when somebody raises a push to main.
    # (not recommended in general!)
    branches: [main]
Doing this can prevent pointless CI jobs from running and save resources.
You can also run on events other than a push. For example:
YAML
on:
  push:
    paths:
      - '**.py'
      - 'pyproject.toml'
  # Run on code in pull requests.
  pull_request:
    paths:
      - '**.py'
      - 'pyproject.toml'
  # This allows you to launch the job manually
  workflow_dispatch:
There is an important subtlety to running on
pull_request versus push:
-
pushruns directly on the commits you push to GitHub. -
pull_requestruns on the code that would result after the pull request has been merged into its target branch.
In collaborative coding projects, it is entirely possible that
main will have diverged from your branch while you were
working on it, and tests that pass on your branch will fail after the
merge. For this reason, it’s recommended to always include both
push and pull_request in your testing
workflows.
Running on pull requests (advanced)
Can you engineer a situation where a CI job passes on
push but fails on pull_request?
- Write a function to a new file, commit the changes, and push it to
your
mainbranch. It can be something as simple as:
- Switch to a new branch
my_branchwithgit switch -c my_branch, and write a test for that function in a new file:
PYTHON
# file: test_message.py
from message import message

def test_message():
assert message() == "foo"- Check that the test passes, and commit it.
- Push
my_branchto GitHub withgit push -u origin my_branch, but don’t raise a pull request yet. - Return to your
mainbranch, and modify the function being tested:
- Push the changes to
main. - Now raise a pull request from
my_branchintomain.
The code on the new branch will be testing the old implementation,
and should pass. However, following the merge, the test would fail. This
results in the push test passing, and the
pull_request test failing.
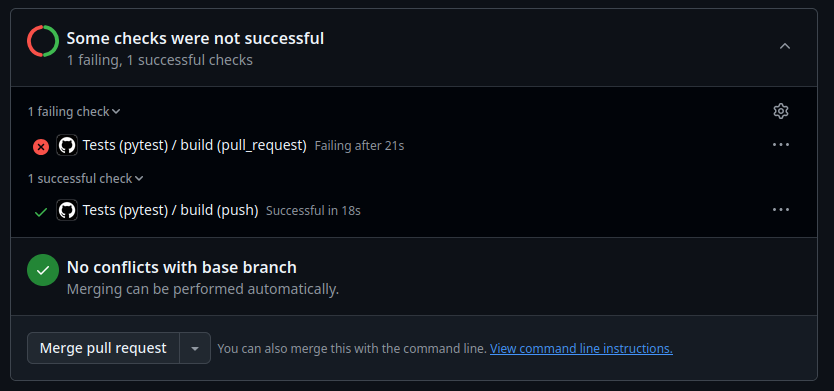
Keypoints
So now, when you or your team want to make a feature or just update the code, the workflow is as follows:
- Create a new branch for the feature
- Write the code for the feature
- Write tests for the feature
- Push the code to GitHub
- Create a Pull Request
- Wait for the tests to pass or fail
- If the tests pass, merge the code into the main branch or fix the code if the tests fail
This will greatly improve the quality of your code and make it easier to collaborate with others.
- Continuous Integration (CI) is the practice of automating the merging of code changes into a project.
- GitHub Actions is a feature of GitHub that allows you to automate the testing of your code.
- GitHub Actions are defined in
yamlfiles and are stored in the.github/workflowsdirectory in your repository. - You can use GitHub Actions to ensure your tests pass before merging
new code into your
mainbranch.